
How to troubleshoot Android Wi-Fi connection problems. Android smartphone users and tablet administrators are now flooding the industry, making Android WiFi troubleshooting a key part of managing corporate wireless network connectivity.
In our wireless network troubleshooting tips, we covered how to troubleshoot physical, AP, router problems in Windows. But what if you’re having trouble with your Android Wi-Fi connection on your smartphone or tablet? Check out these step-by-step tips for troubleshooting Android device Wi-Fi problems.
Time needed: 5 minutes
- Step 1: Check Access Point and Router Settings
Start by confirming that the wireless access point (AP) or router is nearby and has active Wi-Fi, always start here, using another Wi-Fi client to find out what’s available internal, network or client. If multiple clients fail to connect, follow the instructions in our wireless network troubleshooting guide to troubleshoot access point, router, or surface network issues. Otherwise, proceed to step 2 to debug the affected Android client.
- Step 2: Check the Wireless Adopter
Make sure your Android Wi-Fi adapter is turned on. Before proceeding, make sure that your Android device’s Wi-Fi radio is not in Airplane mode and that Wi-Fi is turned on and ready to connect. Tap Settings > Wireless & network > Wi-Fi as shown in Figure 1.
If Wi-Fi is disabled, tap the slider to enable Wi-Fi. When Wi-Fi is turned on, an icon appears in the upper right corner of your home screen. A well-connected Wi-Fi takes precedence over cellular broadband, but it can help to turn off your device’s mobile network connection when you’re trying to update Wi-Fi.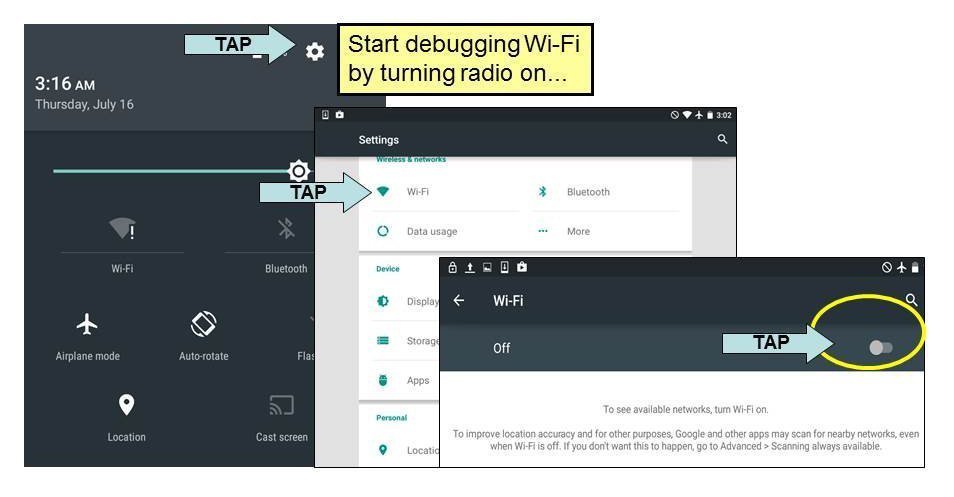
- Step 3: Check the SSID and IP address
Check that your Android client is connected to the SSID and IP address. Go back to your Android device settings > Wireless & networks > Wi-Fi panel and click Wi-Fi settings Find your network name (SSID) in the list of nearby Wi-Fi networks. If your network name is not listed, the access point or router may be hiding its SSID. Click Add Network to manually configure your network name.
If your network is listed but Connected doesn’t appear under its name, tap your network to try connecting. If prompted for a password or key (see step 7), enter it and click Connect. If you try multiple times but it fails, go to step 7.
If connected is already shown under your network name, continue. Note that every time you try to connect the Android Wi-Fi client to any network name, this notification will appear in the Wi-Fi settings panel, in the line called Wi-Fi connected, click Advanced to view the assigned IP address . to the customer.
If the connected client’s IP address is static but not on the correct subnet (see our wireless network troubleshooting guide, step 3), forget the network and connect again, using the “Advanced” setting to select DHCP. If the connected client status shows an address access for a long time, or if your client connects frequently but disconnects quickly, go to step 7. If the connected client’s IP address is in the correct subnet, continue.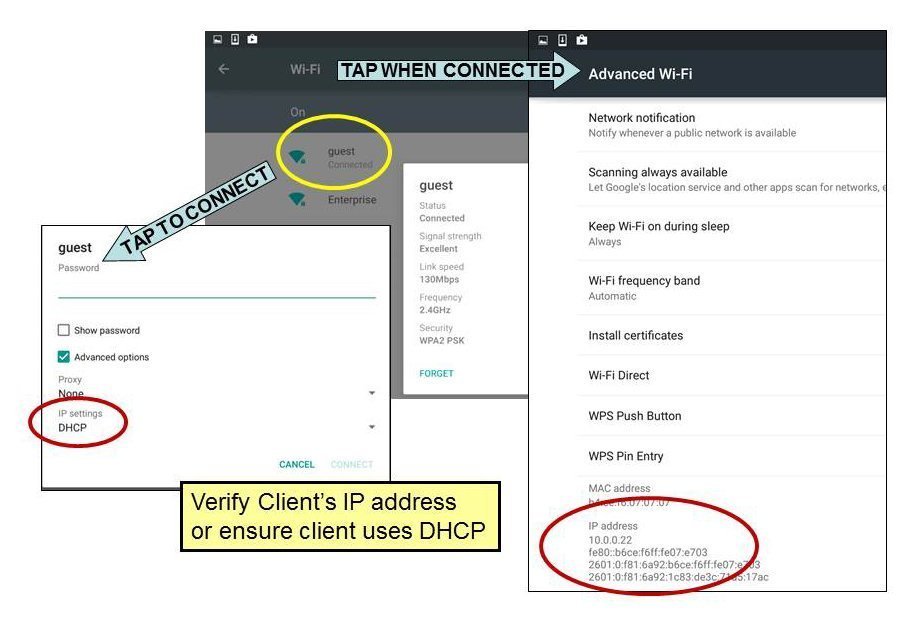
- Step 4: Check the network connection with Ping
Once your Android Wi-Fi client has a valid IP address, use Ping to determine network connectivity. Most Android devices don’t include accessible ping apps, but you can still check network connectivity like these.
Start by using your device’s built-in browser to check for Internet access. If you manage to open or move a website page, congratulations: you are connected!
If you’re getting a web page error on X that may not be temporary, you’ll want to dig deeper. Try browsing to the web administration service for your wireless access point or router (eg http://192.168.1.1). If you can open this page, you are connected to the network, but the network itself has connection problems. Refer to the wireless network troubleshooting guide for additional guidance.
If you can’t navigate to the web management service of your access point or router or web device that can connect to your wireless LAN, you’ll need to troubleshoot the connection in another way. Use Google Play to download and install a free ping app like Fing or IP App. Use this tool to ping the LAN IP address of your access point or router as shown below. If your access point or router pings repeatedly, go to step 5.
If the ping from your access point or router is successful, ping any LAN or wireless clients you want to communicate with. If this ping fails, the AP can be isolated or the destination can use a firewall to block incoming messages. Follow the instructions in our wireless network troubleshooting guide, step 5.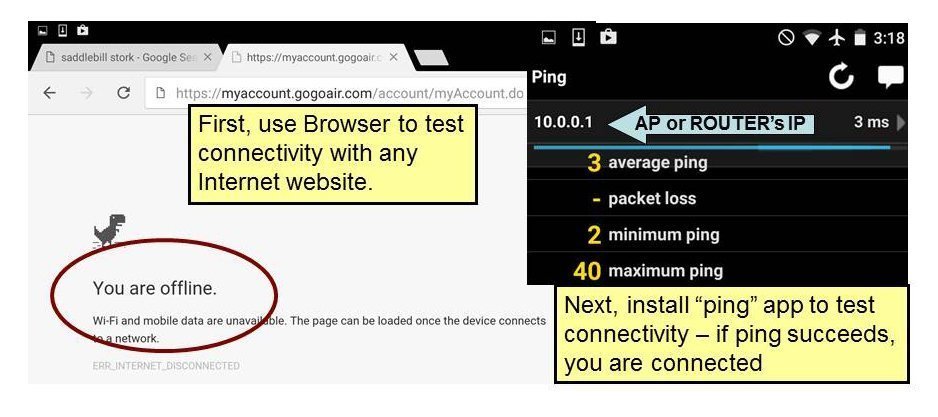
- Step 5 Wireless-specific connection problems
still, get a valid IP address or ping any other system connected to the same subnet, it’s time to look for wireless-specific problems, If your Android Wi- Fi customer still can not connect. The AP/ router and customer must use compatible 802.11 norms. Please note the following
Newer Android devices have integrated single- stream 802.11 ac network appendages. These Android Wi- Fi guests can be connected to 802.11 ac, binary- band 802.11 n, or 802.11 a APs or routers– all of which use channels from the 5 GHz band.
Aged Android Wi- Fi guests that have integrated 802.11 bg or single- band 802.11 n network appendages can be connected to an 802.11 b,802.11 g or 802.11 n AP or router– all of which use channels from the 2.4 GHz band.
To determine which 802.11 norms your wireless network’s AP or router supports, look for “ Wi- Fi certified ” ensigns, or search for Wi- Fi pukka products at the Wi- Fi Alliance website.
In general, newer APs and routers are needed to give backward comity with aged generations of Wi- Fi, but data rate settings must still match. Once you have verified that your AP or router and customer should be compatible, remedy wireless radio settings as described in our wireless network troubleshooting tip, step 6. - Step 6 Check security settings
Still, look for a security mismatch, If a compatible wireless customer and AP/ router can” hear” each other but still can not connect or change business. The customer must support the security mode needed by the AP or router Open, WEP, WPA, or WPA2. Unless a WLAN is open( i.e., relaxed), both endpoints must be configured with( or stoutly admit) identical keys to cipher business between them. Compare security settings on your AP/ router and Android Wi- Fi customer and attempt to match them.
To reconfigure the security parameters for any preliminary saved network, go to Wi- Fi Settings, tap the network’s name, and also valve Forget.
To reconfigure the security parameters for any other network, valve the name of the asked network or Add Wi- Fi network. When connecting to a listed network, Android automatically sets some parameters to match your AP or router and only prompts for parameters that it can not guess, like WEP keys, watchwords and802.1 X usernames. When manually adding a network, you’ll be urged to enter all needed security parameters.
still, enter your AP/ router’s WEP key when urged or tap the Security pull- down to select WEP and copy the WEP key into the customer’s word field, If your AP or router uses WEP.
Still, enter your router’s passphrase when urged or tap the Security pull- down menu to elect WPA/ WPA2- PSK and copy the AP/ router’s Wi- Fi word into the customer’s word field, If your AP or router uses WPA- Personal or WPA2- Personal. Hint Capitalization counts; check Show word to descry any typos.
Still, set the customer’s Security field to 802, If your AP or router uses WPA- Enterprise or WPA2- Enterprise.1 x Enterprise and continue 802.1 X setup as described in step 7.
still, it may still be saved, If you choose the wrong security type when adding a network. You can change the word( or any other security parameter) associated with a saved network by tapping the network’s name. still, it’s frequently easier just to click Forget for any misconfigured network and start fresh.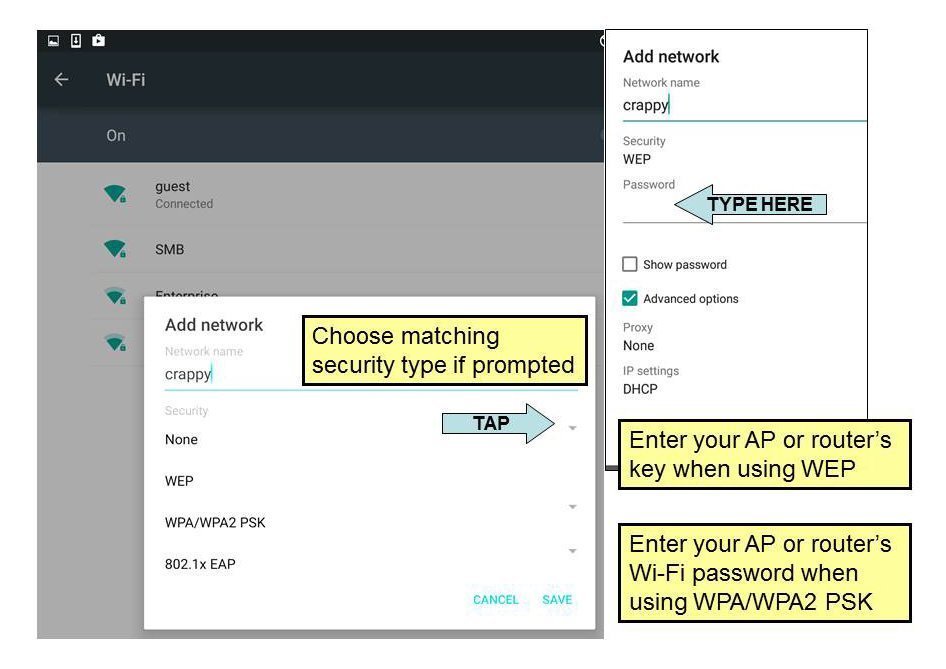
- Step 7: take a look at RADIUS settings
Make sure RADIUS is operating. WPA-employer and WPA2-business enterprise log the Android wireless patron into the network and supply encryption keys the use of an 802.1X-capable RADIUS server. Consult with our network troubleshooting tip, step 8, to test your AP or router’s RADIUS settings.
- Step 8: check 802.1X EAP problems
If RADIUS is operating however your Android wireless client’s connect requests are rejected, look for an 802.1X Extensible Authentication Protocol (EAP) hassle. Your consumer need to assist one of the EAP sorts required via your RADIUS server and must deliver a valid login.
In case your RADIUS server requires EAP-TTLS or PEAP, set the customer’s safety subject to 802.1x EAP, select EAP technique TTLS or PEAP when precipitated, pick a section 2 authentication (e.G., MSCHAPv2 or GTC), and enter your username (identification) and password. MSCHAPv2 is typically used with passwords; GTC is used for token authentication. For most networks, the nameless identification discipline can be left clean. You can optionally select a CA certificate to authenticate the RADIUS server.
If your RADIUS server requires EAP-TLS, set the client’s safety area to 802.1x EAP, choose EAP technique TLS whilst caused, input your username (identification) and pick out a person certificate from the pull-down list.
If the most effective access in the listing is unspecified, you must first add a certificate record on your tool. To do so, replica a certificate to a storage place handy from your device (see discern 6). Hint: email the document to your self and save it in your tool, or add the file onto Google power.
Subsequent, visit the Settings > security panel. Tap set up from garage and pick out the garage place of your certificates report. You may be brought about for a password to unlock the record. The certificate can be loaded into your Android device’s credential garage and should now seem as an choice whilst selecting an EAP-TLS consumer or CA/RADIUS server certificates.
If your RADIUS server calls for every other EAP type, use an Android-well matched cell device manager to configure a wireless community connection with the correct matching settings. While the use of WPA or WPA2-company, this includes now not just including the wi-fi connection, but including any necessary certificates to the wi-fi purchaser.
Figure 5: Match RADIUS server and Android Wi-Fi client EAP methods.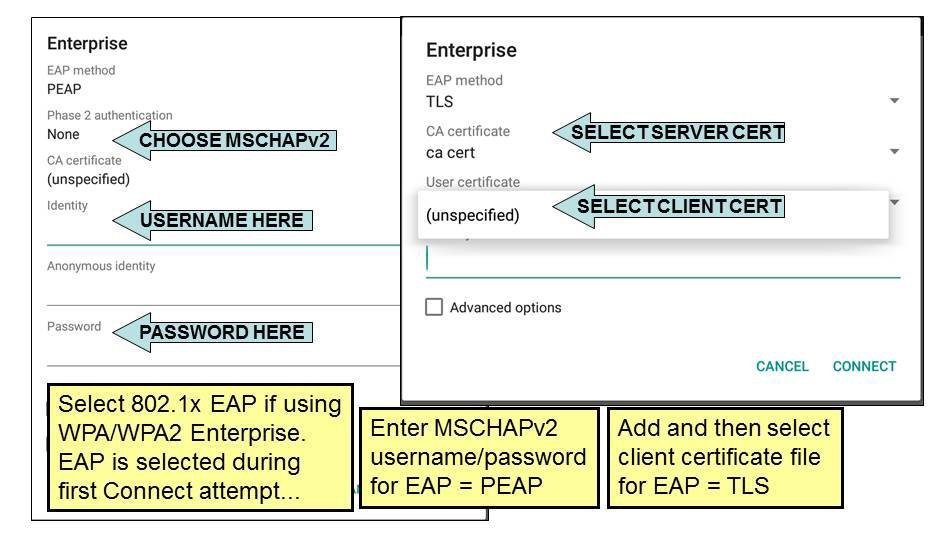
- Step 9: take a look at for intermittent community connections
In case your Android wi-fi purchaser nevertheless cannot seem to connect with the network, seems very sluggish all the time or disconnects regularly, you will be experiencing lower-level wireless problems. Check with our community troubleshooting tip, steps 10 and 11, for similarly instructions.
To facilitate debugging, you can also want to install a few more loose apps. As an instance, see the subsequent:
Ookla SpeedTest — reachable for measuring gradual connections
Wi-fi Analyzer or InSSIDer — View channel, sign/noise, interference, and extra
Fing — try to attain other customers in your personal network.